Saturday, May 11, 2013

IE8 CSS Hack

Using IE8 CSS Hack


You can use the ie8 css hack to force internet explorer to accept your @media queries. The ie8 css hack circumvents the inherent blockage/neglect by internet explorer. After finding the great solution to browser responsive CSS with @media queries you probably cried when finding out they don't work in IE9 and earlier.


This is normal use of: @media 
IE8 CSS Hack
IE8 CSS Hack
The above is discarded by IE9 and earlier. A way around this problem is by using the ie8 only css hack. 

To target IE 6 and 7

@media screen\9 {
    body { background: red; }
} 


To target IE 6, 7 and 8

@media \0screen\,screen\9 {
    body { background: green; }
} 

To target IE 8

@media \0screen {
    body { background: blue; }
} 

To target IE 8, 9 and 10

@media screen\0 {
    body { background: orange; }
} 

To target IE 9 and 10

@media screen and (min-width:0\0) {
    body { background: yellow; }
} 

Big thanks to Keith Clark for finding this ie8 css hack for @media queries.
It does not solve everybody's problem depending on your exact coding but using this css ie8 hack can help in some instances.

IE7 CSS hack

Using IE7 CSS Hacks

You can use ie7 css hacks to force internet explorer to accept your @media queries. After finding the great solution to browser responsive CSS with @media queries you probably cried when finding out they don't work in IE9 and earlier.

This is normal use of: @media 
IE7 CSS hack
IE7 CSS Hack
The above is discarded by IE9 and earlier. A way around this problem is by using CSS Hacks

To target IE 6 and 7

@media screen\9 {
    body { background: red; }
} 


To target IE 6, 7 and 8

@media \0screen\,screen\9 {
    body { background: green; }
} 

To target IE 8

@media \0screen {
    body { background: blue; }
} 

To target IE 8, 9 and 10

@media screen\0 {
    body { background: orange; }
} 

To target IE 9 and 10

@media screen and (min-width:0\0) {
    body { background: yellow; }
} 

Big thanks to Keith Clark for finding the ie7 css hacks out
It does not solve everybody's problem with @media queries. The css hack ie7 works, depending on your exact coding but it can help in some instances.

Tuesday, April 9, 2013

Netgear adattatore wireless WNDA3100v2

Netgear adattatore wireless 

Dopo aver lottato con questo me stesso, ho deciso di contribuire alla grandezza che è Internet, da quando ho visto molte persone che hanno lo stesso problema e le soluzioni diversi, offerti on-line, che non tutti sembrano capire.
Il tasto con l'installazione è Netgear adattatore wireless che avete bisogno di lasciare le finestre creare i file necessari e poi renderli compatibili con Linux, che viene fatto utilizzando ndiswrapper.

Questo è scritto per assoluti principianti di Linux così avanzata non si lamentano.
  1. Ottenere il vostro. Sistemi e file inf. (Fatto su Windows)
    • Poiché la maggior parte niubbi di Linux come me, provengono da Windows presumo che abbiate installato la scheda su un sistema Windows. Passare alla directory Programmi Files (su Windows) e cercare la cartella di NETGEAR. Cercare la cartella di Windows 2000 o XP e copiare tutti i file in là.
    • Se non si ha accesso a un sistema Windows per estrarre i file del driver, c'è un modo per farlo direttamente in Ubuntu usando 'vino'. Dal momento che questo richiede una maggiore maneggevolezza sul sistema Ubuntu e dal momento che questo è stato scritto per i principianti assoluti non voglio discutere di questo.
  2. Ottenere i file del pacchetto ndiswrapper
    • Questi file possono essere trovati qui. Hai bisogno di tutti e tre.
  3. Collocare i file sul vostro sistema Ubuntu
    • Dopo aver ottenuto i file metterli in una cartella sul vostro sistema Ubuntu. Si noti che i file del driver sarà bisogno di stare loro in modo permanente così ha scelto un luogo che non rimuoverà più tardi.
  4. Installazione dei pacchetti ndiswrapper
    • Aprire la finestra del terminale. Ci sono diversi modi per farlo. Il metodo più semplice è premendo Ctrl + Alt + T. Per altri modi guarda qui.
    • Passare alla directory in cui si trovano i file ndiswrapper usando il comando 'cd'.
    • Eseguire i seguenti comandi linux:
      sudo dpkg-i ndiswrapper-common
      sudo dpkg-i ndiswrapper-utils-1.9
      sudo dpkg-i ndisgtk
      Assicurati di farlo in questo ordine. Se si ottiene un errore controllare il
      nomi usati dopo il comando '-i', dal momento che forse ha dato i file di una
      nome o il server di download ha fatto. 
  5. Installare i driver su Ubuntu Netgear adattatore wireless
    • Passare alle impostazioni di sistema (in alto a destra) e cercare driver wireless di Windows. Questo può essere fatto anche da Applicazioni -> Sistema -> driver wireless di Windows.
    • Inserire la password e quindi utilizzare il menu per accedere al file. Inf (fase 1) è stato memorizzato su Ubuntu l 'installazione del driver.
  6. Verificare l'installazione
    • Accedi al tuo nuovo terminale e digitate: sudo lshw-C network. Avanti per la propria interfaccia Ethernet, si dovrebbe vedere qualcosa di simile a questo:
    • -Rete
             Descrizione: Interfaccia wireless
    •        fisico id: 1
    •        nome logico: wlan0
  7. Configurazione della rete wireless
    • Passare al Network Manager facendo clic su una delle icone in alto a destra. Qui è possibile selezionare la rete desiderata e configurare questa. È possibile utilizzare gli stessi dati aas che hai usato in Windows.
Spero che questa ricerca finisce tutti quanti per la WNDA3100 (v2) in soluzione adattatore Ubuntu.

Saturday, March 16, 2013

Lamparas Para Video

Looking at Lamparas Para Video

Lamparas Para Video por cineastas indie consits Solemos ser de iluminación barato debido a restricciones presupuestarias. Al explorar el poder de Colorista II Magic Bullet, estamos hasta la ampliación de material de baja calidad de la película tomada con la Canon 550D también conocido como el Canon T2i, que fue grabado a propósito de las condiciones de iluminación muy malos.
No intente hacer esto Lamparas Para Video a los niños en casa (la parte de iluminación), esto no es como se debe sujetos iluminados.

(Lamparas Barato Para Video- shot YouTube video con Canon 550D)

La idea es mostrar que en el caso de que las malas condiciones de iluminación Lamparas Para Video descubrir después de la filmación ha terminado mucho se puede hacer en la post-prodcution. No siempre se necesitan las cámaras más caras y material de alumbrado o de los presupuestos extravegent proyecto. Si tienes algo de tiempo y dedicación que usted puede aumentar la calidad del material de archivo.

Lamparas Para Video
Lamparas Barato Para Video


  • Lamparas Para Video
  • lamparas de pared
  • lamparas de pie


Project details:
Camera: Canon 550D  (T2i)
Lighting: $10 construction light
Footage: stock footage for a dutch energie commercial
Software: Premier Pro, After Affects, Magic Bullet's Colorista II

Wednesday, March 13, 2013

Linux netgear wnda3100 drivers


 After struggling with the linux netgear driver myself I decided to contribute to greatness that is the Internet, since I saw many people having the same problem and different solutions being offered online, that not everyone seem understood.
Linux netgear drivers
Linux netgear wnda3100 drivers 

The key with the installation is that you need to let windows create the necessary files and then make them compatible with linux, which is done by using ndiswrapper.
This is written for absolute Linux / Ubuntu beginners so advanced users do not complain.
  1. Getting your .sys and .inf files (Done on Windows)
    • Since most Linux noobs like myself come from Windows I assume you have installed the adapter on a windows system. Navigate to your Program Files directory (on windows) and look for the NETGEAR folder. Look for the Windows 2000 or XP folder and copy all the files in there.
    • If you do not have access to a windows systems to extract the driver files, there is a way to do this directly in Ubuntu by using 'wine'. Since this requires more handling on the Ubuntu system and since this is written for absolute beginners I will not discuss that.
  2. Getting the ndiswrapper package files
    • These files can be found here. You need all three.
  3. Place the files on your Ubuntu system
    • After you got the files place them in a folder on you Ubuntu system. Note that the driver files will need to stay their permanently so chose a place you will not remove later.
  4. Installing the ndiswrapper packages
    • Open your terminal window. There are several ways to do this. The easiest is pressing Ctrl+Alt+T. For more ways look here.
    • Navigate to your directory where you located the ndiswrapper files using the 'cd' command.
    • Execute the following linux commands:
      sudo dpkg -i ndiswrapper-common
      sudo dpkg -i ndiswrapper-utils-1.9
      sudo dpkg -i ndisgtk
      Make sure you do it in this order. If you get any errors check the
      names used after the  '-i' command, since you perhaps gave your files a
      different name or the download server did.  
  5. Installing the drivers on Ubuntu
    • Navigate to your System Settings (Top right corner) and look for Windows Wireless Drivers. This can also be done by Applications-->System-->Windows Wireless Drivers.
    • Enter your password and then use the menu to navigate to the .inf file (step 1) that you stored on Ubuntu to instal the driver.
  6. Verify the installation
    • Access your terminal again and type: sudo lshw -C network. Next to your Ethernet interface, you should now see something like this: 
    • -network
             description: Wireless interface
             physical id: 1
             logical name: wlan0
  7. Configuring your Wireless Network
    • Navigate to your Network Manager by clicking one of the icons at the top right corner. Here you can now select the desired network and configure this. You can use the same data aas you used under Windows.
Hope this ends everyones quest for the Linux netgear drivers  under Ubuntu adapter solution.

Netgear Wireless USB Adapter WNDA3100 on linux

Getting the Netgear Wireless USB Adapter to work

After struggling with the netgear wireless usb adapter myself I decided to contribute to greatness that is the Internet, since I saw many people having the same problem and different solutions being offered online, that not everyone seem understood.
Netgear Wireless USB Adapter
The key with the installation is that you need to let windows create the necessary files and then make them compatible with linux, which is done by using ndiswrapper.

This is written for absolute Linux beginners so advanced do not complain.
  1. Getting your .sys and .inf files (Done on Windows)
    • Since most Linux noobs like myself come from Windows I assume you have installed the adapter on a windows system. Navigate to your Program Files directory (on windows) and look for the NETGEAR folder. Look for the Windows 2000 or XP folder and copy all the files in there.
    • If you do not have access to a windows systems to extract the driver files, there is a way to do this directly in Ubuntu by using 'wine'. Since this requires more handling on the Ubuntu system and since this is written for absolute beginners I will not discuss that.
  2. Getting the ndiswrapper package files
    • These files can be found here. You need all three.
  3. Place the files on your Ubuntu system
    • After you got the files place them in a folder on you Ubuntu system. Note that the driver files will need to stay their permanently so chose a place you will not remove later.
  4. Installing the ndiswrapper packages
    • Open your terminal window. There are several ways to do this. The easiest is pressing Ctrl+Alt+T. For more ways look here.
    • Navigate to your directory where you located the ndiswrapper files using the 'cd' command.
    • Execute the following linux commands:
      sudo dpkg -i ndiswrapper-common
      sudo dpkg -i ndiswrapper-utils-1.9
      sudo dpkg -i ndisgtk
      Make sure you do it in this order. If you get any errors check the
      names used after the  '-i' command, since you perhaps gave your files a
      different name or the download server did.  
  5. Installing the drivers on Ubuntu
    • Navigate to your System Settings (Top right corner) and look for Windows Wireless Drivers. This can also be done by Applications-->System-->Windows Wireless Drivers.
    • Enter your password and then use the menu to navigate to the .inf file (step 1) that you stored on Ubuntu to instal the driver.
  6. Verify the installation
    • Access your terminal again and type: sudo lshw -C network. Next to your Ethernet interface, you should now see something like this: 
    • -network
             description: Wireless interface
             physical id: 1
             logical name: wlan0
  7. Configuring your Wireless Network
    • Navigate to your Network Manager by clicking one of the icons at the top right corner. Here you can now select the desired network and configure this. You can use the same data aas you used under Windows.
Hope this ends everyones quest for the Netgear Wireless USB Adapter on Ubuntu.

Monday, March 11, 2013

Java Runtime Environment Must Be Available To Run Eclipse

When using the Android SDK Java Runtime Environment Must Be Available To Run Eclipse

Java Runtime Environment Must Be Available To Run Eclipse
Java Runtime Environment Must Be Available To Run Eclipse Screenhot
When running the eclipse.exe from the adt-bundle-windows-x86_64 package you probably get the error in the image to the right:


Android Eclipse SDK installation: A Java Runtime Environment (JRE) or Java Development Kit (JDK) must be available in order to run Eclipse. No Java virtual machine was found after searching the following locations:
NO problem. Ussually this means you are running 32 bit java on a 64 bit system. because your browser is 32 bit so the SUN website automitically checks for 32 bit java only.
Most issues dissapear by simply installing 64 bit java. If not, just follow these steps:

FOR 64 bit systems:
Java Runtime Environment Must Be Available To Run Eclipse
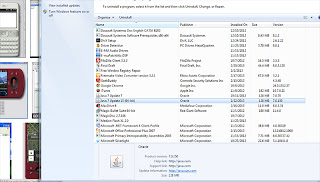
screenshot java 64 bit installed
  1. Check if you have latest 64 bit java installed
    1. Start --> control panel --> programs [see screenshot]
  2. If yes, all you have to do is add the following code to your eclipse.ini file:
  3. -vm
    [location of your javaw.exe] for me this is: D:\TempPrograms\Java\bin\javaw.exe
    If not, go to: http://java.com/en/download/manual.jsp for manual java download and install 64 bit java
  4. Done!

FOR 32 bit systems:

  1. Check if you have latest 32 bit java installed
    1. go to java website: http://java.com/en/download/installed.jsp
  2. If yes, all you have to do is add the following code to your eclipse.ini file:
  3. -vm
    [location of your javaw.exe] for me this is: D:\TempPrograms\Java\bin\javaw.exe

  4. Done!
Now you should no more get the dreaded message: Java Runtime Environment Must Be Available To Run Eclipse

Eclipse Not Running

Eclipse not running on windows 7 64 bit or 32 bit

eclipse not running
Eclipse Not Running
When running the eclipse.exe from the adt-bundle-windows-x86_64 package you probably get the error in the image to the right:


Android Eclipse SDK installation: A Java Runtime Environment (JRE) or Java Development Kit (JDK) must be available in order to run Eclipse. No Java virtual machine was found after searching the following locations:


If Eclipse is not running this is NO problem. Ussually this means you are running 32 bit java on a 64 bit system. because your browser is 32 bit so the SUN website automitically checks for 32 bit java only.
The issue of Eclipse not running usually  dissapear by simply installing 64 bit java. If not, just follow these steps:

Eclipse Not Running FOR 64 bit systems:
eclipse not running
screenshot java 64 bit installed
  1. Check if you have latest 64 bit java installed
    1. Start --> control panel --> programs [see screenshot]
  2. If yes, all you have to do is add the following code to your eclipse.ini file:
  3. -vm
    [location of your javaw.exe] for me this is: D:\TempPrograms\Java\bin\javaw.exe
    If not, go to: http://java.com/en/download/manual.jsp for manual java download and install 64 bit java
  4. Done!

Eclipse Not Running FOR 32 bit systems:
  1. Check if you have latest 32 bit java installed
    1. go to java website: http://java.com/en/download/installed.jsp
  2. If yes, all you have to do is add the following code to your eclipse.ini file:
  3. -vm
    [location of your javaw.exe] for me this is: D:\TempPrograms\Java\bin\javaw.exe
  4. Done!
This should clear your problem of Eclipse Not Running.


  • Eclipse Not Running

Netgear wnda3100 Treiber funktioniert nicht


Nach dem Kampf mit diesem netgear wnda3100 treibers selbst habe ich beschlossen, zur Größe, die das Internet beitragen, da ich viele Leute mit dem gleichen Problem und verschiedene Lösungen angeboten online, dass nicht jeder verstehen scheinen sah.

Die Taste mit der Installation ist, dass Sie lassen Sie Windows die notwendigen Dateien und dann machen sie kompatibel mit Linux, die durch die Nutzung ndiswrapper gemacht wird müssen

Dies ist für die absolute Linux oder Ubuntu Anfänger geschrieben so weit fortgeschritten, nicht beklagen.

Netgear
  1. Wie Sie Ihre .sys und .inf Dateien (abgeschlossen am Windows)
    • Da die meisten Linux noobs wie ich von Windows komme ich nehme an, Sie haben den Adapter auf einem Windows-System installiert ist. Navigieren Sie zu Ihrem Verzeichnis Programme (unter Windows) und suchen Sie nach dem NETGEAR Ordner. Achten Sie auf das Windows 2000 oder XP Ordner und kopieren Sie alle Dateien dort.
    • Wenn Sie keinen Zugang zu einem Windows-Systemen, um die Treiber-Dateien zu extrahieren, gibt es eine Möglichkeit, dies direkt zu tun in Ubuntu mit "Wein". Da dies erfordert mehr Handling auf der Ubuntu-System, und da dies für absolute Anfänger geschrieben wird, werde ich nicht diskutieren, dass.
  2. Getting the ndiswrapper Paketdateien
    • Diese Dateien können hier gefunden werden. Sie müssen alle drei. 
  3. Legen Sie die Dateien auf Ihrem Ubuntu-System
    • Nachdem Sie haben die Dateien legen Sie sie in einem Ordner auf Sie Ubuntu-System. Beachten Sie, dass die Treiber-Dateien bleiben müssen ihre dauerhaft so wählte einen Ort, den Sie nicht entfernen wird später.
  4. Installieren der ndiswrapper-Pakete
    • Öffnen Sie das Terminal-Fenster. Es gibt mehrere Möglichkeiten, dies zu tun. Die einfachste ist die Tastenkombination Strg + Alt + T. Weitere Möglichkeiten gibt es hier
    • Navigieren Sie zu Ihrem Verzeichnis, in dem Sie sich befinden, die ndiswrapper-Dateien mit dem "cd"-Befehl.
    • Führen Sie die folgenden Linux-Befehle:
      sudo dpkg -i ndiswrapper-common
      sudo dpkg -i ndiswrapper-utils-1.9
      sudo dpkg -i ndisgtk
      Stellen Sie sicher, Sie tun es in dieser Reihenfolge. Wenn Sie irgendwelche Fehler überprüfen Sie die Namen nach dem '-i' Befehl verwendet, da ihr habt vielleicht Ihre Dateien ein anderen Namen oder der Download-Server hat. 
  5. Installation der Treiber auf Ubuntu
    • Navigieren Sie zu Ihrem System Settings (oben rechts) und suchen Sie nach Windows Wireless Treibers. Dies kann auch durch Anwendungen durchgeführt werden -> System -> Windows Wireless Drivers.
    • Geben Sie Ihr Passwort ein und verwenden Sie dann das Menü, um die. Inf-Datei (Schritt 1) ​​zu navigieren, die Sie auf Ubuntu gespeichert, um die Treiberinstallation.
  6. Überprüfen Sie die Installation
    • Greifen Sie auf Ihre Terminal wieder und Typ: sudo lshw-C-Netz. Weiter, um die Ethernet-Schnittstelle, sollten Sie jetzt etwas sehen wie folgt aus:
    • -netzwerk       
    •  Beschreibung: Wireless-Schnittstelle
    •        physikalische id: 1
    •        logische Name: wlan0
  7. Ihre Netzwerk-Konfiguration
    • Navigieren Sie zu Ihrem Network Manager, indem Sie eines der Symbole in der oberen rechten Ecke. Hier können Sie nun auswählen, das gewünschte Netzwerk und konfigurieren Sie dieses. Sie können die gleichen Daten aas Sie unter Windows verwendet.
Hoffen, dass diese Enden jedeman suche nach dem Netgear WNDA3100 wireless-adapter  unter Ubuntu.

Netgear adattatore wireless WNDA3100v2 non lavorando su Ubuntu 11.04 / linux (ndiswrapper non funziona)


(Tags: Netgear adattatore wireless WNDA3100v2 non lavorando su Ubuntu 11.04 / linux (ndiswrapper non funziona) / non funziona WNDA3100 su linux / adattatore wireless WNDA3100 / wnda3100v2 / WNDA3100 ubuntu / adattatore netgear WNDA3100 / netgear adattatore wnda3100v2 / netgear adattatore wireless / NETGEAR WNDA3100 driver / netgear wnda3100v2 driver / linux ubuntu distribuzione / WNDA3100 adattatore su ubuntu)
  
Dopo aver lottato con questo me stesso, ho deciso di contribuire alla grandezza che è Internet, da quando ho visto molte persone che hanno lo stesso problema e le soluzioni diversi, offerti on-line, che non tutti sembrano capire.

Il tasto con l'installazione è che avete bisogno di lasciare le finestre creare i file necessari e poi renderli compatibili con Linux, che viene fatto utilizzando ndiswrapper.

Questo è scritto per assoluti principianti di Linux così avanzata non si lamentano.
  1. Ottenere il vostro. Sistemi e file inf. (Fatto su Windows)
    • Poiché la maggior parte niubbi di Linux come me, provengono da Windows presumo che abbiate installato la scheda su un sistema Windows. Passare alla directory Programmi Files (su Windows) e cercare la cartella di NETGEAR. Cercare la cartella di Windows 2000 o XP e copiare tutti i file in là.
    • Se non si ha accesso a un sistema Windows per estrarre i file del driver, c'è un modo per farlo direttamente in Ubuntu usando 'vino'. Dal momento che questo richiede una maggiore maneggevolezza sul sistema Ubuntu e dal momento che questo è stato scritto per i principianti assoluti non voglio discutere di questo.
  2. Ottenere i file del pacchetto ndiswrapper
    • Questi file possono essere trovati qui. Hai bisogno di tutti e tre.
  3. Collocare i file sul vostro sistema Ubuntu
    • Dopo aver ottenuto i file metterli in una cartella sul vostro sistema Ubuntu. Si noti che i file del driver sarà bisogno di stare loro in modo permanente così ha scelto un luogo che non rimuoverà più tardi.
  4. Installazione dei pacchetti ndiswrapper
    • Aprire la finestra del terminale. Ci sono diversi modi per farlo. Il metodo più semplice è premendo Ctrl + Alt + T. Per altri modi guarda qui.
    • Passare alla directory in cui si trovano i file ndiswrapper usando il comando 'cd'.
    • Eseguire i seguenti comandi linux:
      sudo dpkg-i ndiswrapper-common
      sudo dpkg-i ndiswrapper-utils-1.9
      sudo dpkg-i ndisgtk
      Assicurati di farlo in questo ordine. Se si ottiene un errore controllare il
      nomi usati dopo il comando '-i', dal momento che forse ha dato i file di una
      nome o il server di download ha fatto. 
  5. Installare i driver su Ubuntu
    • Passare alle impostazioni di sistema (in alto a destra) e cercare driver wireless di Windows. Questo può essere fatto anche da Applicazioni -> Sistema -> driver wireless di Windows.
    • Inserire la password e quindi utilizzare il menu per accedere al file. Inf (fase 1) è stato memorizzato su Ubuntu l 'installazione del driver.
  6. Verificare l'installazione
    • Accedi al tuo nuovo terminale e digitate: sudo lshw-C network. Avanti per la propria interfaccia Ethernet, si dovrebbe vedere qualcosa di simile a questo:
    • -Rete
             Descrizione: Interfaccia wireless
    •        fisico id: 1
    •        nome logico: wlan0
  7. Configurazione della rete wireless
    • Passare al Network Manager facendo clic su una delle icone in alto a destra. Qui è possibile selezionare la rete desiderata e configurare questa. È possibile utilizzare gli stessi dati aas che hai usato in Windows.
Spero che questa ricerca finisce tutti quanti per la WNDA3100 (v2) in soluzione adattatore Ubuntu.

(Tags: WNDA3100v2 non funziona / non funziona WNDA3100 su linux / adattatore wireless WNDA3100 / wnda3100v2 / WNDA3100 / adattatore netgear WNDA3100 / netgear adattatore wnda3100v2 / netgear adattatore wireless / NETGEAR WNDA3100 driver / netgear wnda3100v2 driver / linux ubuntu distribuzione / WNDA3100 adattatore su ubuntu)

Sunday, March 10, 2013

Netgear adaptateur sans fil ne fonctionne pas WNDA3100v2 Ubuntu 11.04 / linux (ndiswrapper ne fonctionne pas)


(Tags: WNDA3100v2 ne fonctionne pas / WNDA3100 ne fonctionne pas sur linux / adaptateur sans fil WNDA3100 / wnda3100v2 / WNDA3100 / netgear adaptateur WNDA3100 / netgear adaptateur wnda3100v2 / netgear adaptateur sans fil / Netgear WNDA3100 driver / pilote netgear wnda3100v2 / linux ubuntu distribution / WNDA3100 Adaptateur sur ubuntu)

Après avoir lutté avec moi-même, j'ai décidé de contribuer à la grandeur qui est l'Internet, depuis que j'ai vu beaucoup de gens ayant le même problème et les différentes solutions offertes en ligne, que tout le monde ne semble comprendre.

La clé de l'installation, c'est que vous avez besoin de laisser Windows de créer les fichiers nécessaires, puis de les rendre compatibles avec Linux, ce qui est fait en utilisant ndiswrapper.

Ce qui est écrit pour les débutants absolus Linux si avancé ne se plaignent pas.
  1. Obtenir vos systèmes. Et inf. (Fait sous Windows)
    • Comme la plupart des noobs comme moi, Linux proviennent de Windows je suppose que vous avez installé la carte sur un système Windows. Accédez à votre répertoire Program Files (sous windows) et recherchez le dossier NETGEAR. Recherchez le dossier Windows 2000 ou XP et copiez tous les fichiers à l'intérieur.
    • Si vous n'avez pas accès à un système Windows pour extraire les fichiers du pilote, il ya une façon de le faire directement dans Ubuntu en utilisant «vin». Depuis cela nécessite plus de traitement sur le système Ubuntu et depuis ce qui est écrit pour les débutants Je ne vais pas discuter de cela.
  2. Obtenir les fichiers de paquets ndiswrapper
    • Ces fichiers peuvent être trouvés ici. Vous devez tous les trois.
  3. Placez les fichiers sur votre système Ubuntu
    • Après avoir obtenu les fichiers les placer dans un dossier sur votre système Ubuntu. Notez que les fichiers du pilote devra rester de façon permanente leur a choisi un endroit que vous ne retirez plus tard.
  4. Installation des paquets ndiswrapper
    • Ouvrez votre fenêtre de terminal. Il ya plusieurs façons de le faire. Le plus simple est en appuyant sur Ctrl + Alt + T. Pour plus de moyens regardez ici.
    • Accédez à votre répertoire où vous avez trouvé les fichiers en utilisant ndiswrapper 'cd' commande.
    • Exécutez les commandes suivantes linux:
      sudo dpkg -i ndiswrapper-common
      sudo dpkg -i ndiswrapper-utils-1.9
      sudo dpkg -i ndisgtk
      Assurez-vous de le faire dans cet ordre. Si vous obtenez des erreurs de vérifier la
      noms utilisés après la commande '-i', puisque vous peut-être donné à vos fichiers d'un
      autre nom ou le serveur de téléchargement a fait.
  5. Installation des pilotes sur Ubuntu
    • Accédez à vos paramètres système (coin supérieur droit) et chercher les pilotes sans fil Windows. Cela peut aussi être fait par Applications -> Système -> Windows Pilotes sans fil.
    • Entrez votre mot de passe, puis utiliser le menu pour naviguer vers le fichier. Inf (étape 1) que vous avez stocké sur Ubuntu pour installer le pilote.
  6. Vérification de l'installation
    • Accédez à votre terminal de nouveau et tapez: sudo lshw-C du réseau. À côté de votre interface Ethernet, vous devriez maintenant voir quelque chose comme ceci:
    • -Réseau
             description: Wireless interface
             physical id: 1
             logical name: wlan0
  7. Configuration de votre réseau sans fil
    • Accédez à votre gestionnaire de réseau en cliquant sur l'une des icônes dans le coin supérieur droit. Ici, vous pouvez maintenant sélectionner le réseau désiré et configurer. Vous pouvez utiliser les mêmes données que vous aas utilisés sous Windows.
J'espère que cette quête se termine de tout le monde pour le WNDA3100 (v2) sous Ubuntu adaptateur solution.

(Tags: WNDA3100v2 ne fonctionne pas / WNDA3100 ne fonctionne pas sur linux / adaptateur sans fil WNDA3100 / wnda3100v2 / WNDA3100 / netgear adaptateur WNDA3100 / netgear adaptateur wnda3100v2 / netgear adaptateur sans fil / Netgear WNDA3100 driver / pilote netgear wnda3100v2 / linux ubuntu distribution / WNDA3100 Adaptateur sur ubuntu)

Saturday, February 23, 2013

Android Eclipse SDK installation

Trying to launch Eclipse on windows 7 64 bit or 32 bit

Android Eclipse SDK installation
Screenshot Android Eclipse SDK installation error
After the Android Eclipse SDK installation, when running the eclipse.exe from the adt-bundle-windows-x86_64 package you probably get the error in the image to the right:


Android Eclipse SDK installation: A Java Runtime Environment (JRE) or Java Development Kit (JDK) must be available in order to run Eclipse. No Java virtual machine was found after searching the following locations:

NO problem. Ussually this means you are running 32 bit java on a 64 bit system. because your browser is 32 bit so the SUN website automitically checks for 32 bit java only.
Most issues dissapear by simply installing 64 bit java. If not, just follow these steps:

FOR 64 bit systems:
screenshot java 64 bit installed
  1. Check if you have latest 64 bit java installed
    1. Start --> control panel --> programs [see screenshot]
  2. If yes, all you have to do is add the following code to your eclipse.ini file:
  3. -vm
    [location of your javaw.exe] for me this is: D:\TempPrograms\Java\bin\javaw.exe
    If not, go to: http://java.com/en/download/manual.jsp for manual java download and install 64 bit java
  4. Done!

FOR 32 bit systems:

  1. Check if you have latest 32 bit java installed
    1. go to java website: http://java.com/en/download/installed.jsp
  2. If yes, all you have to do is add the following code to your eclipse.ini file:
  3. -vm
    [location of your javaw.exe] for me this is: D:\TempPrograms\Java\bin\javaw.exe

  4. Done!
This concludes the Android Eclipse SDK installation.